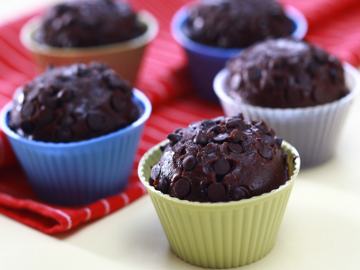
Bahan: 100 g chocolate chips 125 g gula pasir 2 butir telur ayam 300 ml susu segar 60 ml minyak sayur Ayak jadi satu: 50 g cokelat bubuk 280 g tepung terigu 2 sdt soda kue 1 sdt vanili bubuk ½ sdt garam
Cara membuat:
Aduk campuran terigu dengan gula dan sebagian chocolate chips.
Campur telur, susu dan minyak, aduk hingga rata.
Tuang ke dalam campuran terigu, aduk hingga rata.
Tuang adonan ke dalam cetakan muffin. Ratakan.
Taburi dengan chocolate chips.
Panggang dalam oven panas selama 20 menit hingga matang.
Takoyaki (octopus balls) biasanya dijual sebagai jajanan kaki lima, namun jajanan ini dapat juga dibuat di rumah. Apapun itu, hal terpenting adalah bila Anda memiliki takoyaki grill (takoyaki-ki), akan memudahkan Anda membuat takoyaki.
Asal muasal takoyaki Awalnya, takoyaki atau octopus balls hanyalah snack bulat berdiameter 3-5 cm yang diisi dengan potongan gurita di dalamnya, disajikan dengan saus. Takoyaki ini dijual menggunakan tusukan bambu berisi 3 bulatan per tusuknya, saat membeli kita bisa melihat aksi penjualnya yang asik mombolak-balik takoyaki di atas wajan hingga berbentuk bulat dan matang.
Dalam penyajiannya, takoyaki selalu dijual dalam bentuk porsian. 1 porsi biasanya berisi 3-10 buah dalam 1 wadah, yang selalu disertakan tusuk gigi atau sumpit sekali pakai. Di negeri asalnya takoyaki biasa dijual dalam wadah berbentuk perahu.
Takoyaki sangat tenar di Jepang, khususnya Kansai, Tokyo dan Osaka. Snack mungil ini paling nikmat bil disantap dalam keadaan panas sebagai camilan, dan saat ini di Jepang takoyaki sudah dapat dibeli dalam kondisi beku (frozen), sehingga pembeli tinggal memanaskan dalam microwafe. Bahkan tiap rumah di Osaka biasanya memiliki wajan (loyang) takoyaki. Takoyaki digunakan sebagai makanan kebanggaan, yang sering dijadikan lauk untuk makan nasi putih. Bahan-bahan untuk membuat takoyaki tersedia secara lengkap di toko. Wajan takoyaki merupakan salah satu perabot rumah tangga yang seharusnya dihadiahkan orangtua kepada anak perempuan yang menjadi pengantin.
Bahan asinan jahe berwarna merah (benishoga) sering pula dicampurkan ke dalam adonan. Penjual yang senang berkreasi kadangkala menambahkan keju atau konnyaku ke dalam takoyaki. Saus yang dipakai biasanya adalah saus okonomiyaki walaupun ada juga saus khusus untuk takoyaki yang rasanya tidak jauh berbeda dengan saus okonomiyaki.
Takoyaki dengan isi yang disukai penduduk setempat (kadang-kadang tanpa gurita) berusaha diperkenalkan di negara-negara yang penduduknya merasa ngeri memakan gurita. Saat ini, kita dapat menjumpai takoyaki dijual dengan pilihan isi dan disajikan dalam wadah cup kertas, kantung kertas maupun box mungil.
CARA MEMBUAT TAKOYAKI Bahan Isi: 200 gr Baby Octopus (bayi gurita), rebus & cincang Tenkasu (Rice Crispy) secukupnya
Bahan Adonan: 400 ml Air 200gr tepung terigu protein rendah 15 gr Katsuo- bushi 2 butir kuning telur 4 butir kuning telur 2sdm mentega Konbu 10cm, potong selebar 2cm
Pendamping Takoyaki: 50 ml Bulldog Saus 25 ml Saus Inggris 50 gr mayonaisse Benishoga (acar jahe secukupnya)
Cara Membuat Adonan Dasar: Masukkan konbu dalam panci, masak di atas api kecil. Angkat beberapa saat sebelum air mendidih. Campur katsuo-bushi dalam air rebusan konbu sambil di aduk selama 2 menit. Saring & dinginkan. Campur terigu, telur & garam. Tuang air kaldu, aduk hingga rata. Sisihkan.
Cara Membuat Takoyaki: Tuang adonan Takoyaki pada Cetakan Takoyaki yng sudah diolesi dengan mentega hingga penuh. Taburi bagian atasnya dengan rice crispy dan masukkan baby octopus (potongan bayi gurita). Masak diatas api kecil. Bila sudah setengah matang, balik adonan dengan bantuan tusuk sate. Bentuk adonan hingga bulat, tambahkan sedikit adonan lagi agar menjadi bulat penuh. Masak hingga berwarna kecoklatan. Angkat dan sajikan bersama saus pendamping dan benishoga.
Cara Membuat Pancake Coklat Enak - Menu Pancake sudah banyak ditemui diberbagai cafe di Indonesia. Cara buat pancake juga tidak terlalu sulit. Oleh karena itu, banyak orang mengkonsumsi pancake untuk sarapan ataupun untuk hidangan istimewa di keluarganya.
contoh pancake enak
Bagi anda yang ingin membuat pancake, mungkin sering bertanya-tanya bagaimana membuat pancakeyang enak itu. Atau berencana untuk memasak pancake untuk sajian keluarga atau teman-teman?
Campur rata dan aduk tepung terigu, garam, kuning telur dan susu dengan ballon whisk sampai rata atau bisa menggunakan mixer dengan kecepatan yang paling rendah (kalau tidak punya ballon whisk dan mixer, bisa juga menggunakan spatula kayu)
Kocok putih telur sampai kaku. Bisa menggunakan garpu maupun ballon whisk.
Kemudian masukkan adonan tepung ke dalam adonan putih telur, aduk rata. Nah dalam mencampur adonan tepung dengan putih telur, bisa juga menggunakan tehnik pancing. Dengan cara mengambil sedikit putih telur dan campurkan ke dalam terigu, aduk rata. tambah sedikit demi sedikit. Kemudian baru masukkan adonan terigu ke dalam putih telur. Langkah ini untuk menghindari putih telur yang bergerindil.
Panaskan teflon diameter paling kecil (yang untuk bikin telor ceplok), oles dengan margarin, kecilkan api. Bisa juga menggunakan teflon ukuran standar.
Tuang adonan sekitar 2,5 sendok sayur, tutup sebentar
Balik jika adonan sudah ada sedikit berpori dan sedikit mengeras pinggirnya
ilustrasi: gambar pancake
Hasil : 7 Pancake
Tips memasak pancake:
Kunci utama kenapa pancake diatas bisa lembut teksturnya walaupun tanpa menggunakan buttermilk adalah pada pemisahan kuning telur dengan putih telurnya.
Untuk mendapatkan pancake yang lebih manis bisa menambahkan 1 sendok makan gula pasir yang diaduk bersama dengan terigu, garam, kuning telur, dan susu.
Pancake ini sangat enak bila disajikan hangat-hangat.
Bila tidak punya wajan teflon seukuran telur ceplok, bisa mneggunakan wajan teflon biasa walaupun nanti bentuk pancakenya menjadi tidak seragam. Atau bisa juga menggunakan ring/cetakan pancake seperti bentuk bulat, bintang, dll.
Nah, itulah panduan atau cara membuat pancake sederhana yang bisa anda langsung praktekkan untuk hidangan sarapan ataupun santapan siang atau sore hari. Oh ya, apakah pancake bisa membuat kolesterolnaik? Hm,,, ntar dibagikan lagi ya informasinya.
Mengkonsumsi pancake akan lebih mengasyikkan jika ditambah minum puding agar. Ada kenikmatan tersendiri disana. Oke deh, selamat praktek yah.
Red Velvet Cake. Until I met my husband, I had never even heard of a red velvet cake. Since it seems to be a Southern specialty, I guess it’s not surprising that I never ran across one growing up in California. But thanks to the California cupcake boom, it seems like there’s now a cupcake shop on every corner and every single one of them features some version of miniature red velvet cake.
But that’s not why I made this cake. You see, my husband’s family LOVES Red Velvet Cake. His sister Katie gets it every year for her birthday, but they all love it. From hearing Justin, Katie, and Daniel talk about it, I began to think that this mysterious red cake had magical powers. But somehow, after seven years of marriage, I have yet to taste my mother-in-law’s version.
And partly because I was tired of waiting, but mostly in celebration of a momentous occasion, I decided to take matters into my own hands, and give this cake a try myself. Luckily, I had the family recipe!
You see, right before we left Sicily last year, my husband was promoted. In the military, promotions are always a big deal, but this one happened to be a VERY big deal. I could have baked a carrot cake, which is definitely one of his favorites. I even toyed with the idea of a Black Forest Cake, another one that gets requested from time to time (maybe next time, Justin). But there was something about this Red Velvet Cake that fascinated me. And since I had THE family recipe in my book, I decided it would be a fun surprise!
Now, I won’t lie. After reading the recipe, I was a little hesitant about making a cake that uses two full ounces of red food coloring. I even got online to check other red velvet cake recipes to make sure that I had copied the recipe down right! Sure enough, lots of Red Velvet Cake recipes require the same amount of food coloring. And, I wanted to stay true to the recipe that his family loves, so I gave it a try. And in the process, lot of things in my kitchen turned red!
Especially my hands. Please make sure you don’t wear white clothing while making this cake!
But, using all that food coloring really does make a beautiful, beautiful cake. Just look at these layers as they came out of the oven! As soon as I saw them, I was glad that I gave this cake a try.
And although it might not be the traditional frosting, my husband loves cream cheese frosting (and so do I), so that’s what I used on this cake. I baked two 9-inch layers, rather than three, since I don’t have the 8-inch cake pans. It was beautiful as it was, but I can only imagine that the three red layers would be even more beautiful and dramatic.
Since it’s difficult to keep the red crumbs from showing on the white frosting, I attacked this frosting job with a specific plan in mind. I first put a thin layer of frosting all over the cake, to trap the unruly red crumbs. I might have even stuck it in the fridge for a bit to set that first layer of frosting, but I honestly can’t remember now.
Next, I added a second layer of frosting to cover up any hint of what lay beneath.
Part of what was so amazing about this cake is that once it’s frosted, no one has any idea of the bright red surprise waiting inside.
Now, although I did stay true to the amount of food coloring in the original family recipe, I did make a few small changes. For one thing, the original recipe calls for shortening, and I decided to use unsalted butter instead. It’s not that I never use shortening any more, it’s just that I generally prefer butter. And also, that’s what I had on hand the day I made the cake! If you prefer shortening in cakes, go for it! I also added an extra tablespoon of cocoa powder, the original recipe called for only one tablespoon. I think everything else is pretty true to the original.
I thought this really was a great cake. For one thing, it’s absolutely beautiful. But it’s also got a great flavor, although the flavor is really kind of hard to describe. Just trust me, it’s good. It was also very moist, which is my favorite kind of cake! And although the original recipe says you can frost it with either buttercream or cream cheese frosting, I really do recommend the cream cheese!
Update 2/4/09: I also turned this cake recipe into Red Velvet Cupcakes, just in time for Valentine’s Day!
Red Velvet Cake (a.k.a. Waldorf Astoria Cake)
2 1/2 cups sifted cake flour* 1 teaspoon baking powder 1 teaspoon salt 2 Tablespoons cocoa powder (unsweetened) 2 oz. red food coloring 1/2 cup unsalted butter, at room temperature 1 1/2 cups sugar 2 eggs, at room temperature 1 teaspoon vanilla extract 1 cup buttermilk, at room temperature 1 teaspoon white vinegar 1 teaspoon baking soda
1. Preheat oven to 350 degrees. Butter and flour two 9-inch round cake pans or three 8-inch round cake pans.
2. Sift together the cake flour, baking powder, and salt into a medium bowl; set aside. In a small bowl, mix food coloring and cocoa powder to form a thin paste without lumps; set aside.
3. In a large bowl, using a hand mixer or stand mixer, beat butter and sugar together until light and fluffy, about three minutes. Beat in eggs, one at a time, then beat in vanilla and the red cocoa paste, scraping down the bowl with a spatula as you go. Add one third of the flour mixture to the butter mixture, beat well, then beat in half of the buttermilk. Beat in another third of flour mixture, then second half of buttermilk. End with the last third of the flour mixture, beat until well combined, making sure to scrape down the bowl with a spatula.
4. Make sure you have cake pans buttered, floured, and nearby. In a small bowl, mix vinegar and baking soda. Yes, it will fizz! Add it to the cake batter and stir well to combine. Working quickly, divide batter evenly between the cake pans and place them in a preheated 350 degree oven. Bake for 25-30 minutes. Check early, cake is done when a toothpick inserted in the center comes out clean.
5. Cool the cakes in their pans on a wire rack for 10 minutes. To remove the cakes from the pan, place a wire rack on top of the cake pan and invert, then gently lift the pan. Allow cakes to cool completely before frosting. Frost with buttercream or cream cheese icing (recipe below).
Recipe Notes: *Sift cake flour once before measuring, then sift again with the other dry ingredients per recipe instructions. Wear an apron and be careful with the red food coloring–no matter how hard I try, I always end up staining something! As you’re mixing the cake batter, use a spatula to scrape down the bowl frequently throughout the entire process.
Cream Cheese Frosting
16 oz. cream cheese (2 packages), softened 1/2 cup unsalted butter (one stick), softened 1 teaspoon vanilla extract 2 1/2 cups powdered sugar, sifted pinch of salt
With an electric mixer, blend together cream cheese and butter until smooth. Turn mixer to low speed and blend in powdered sugar, salt and vanilla extract. Turn mixer on high and beat until light and fluffy. Use immediately or refrigerate, covered, until ready to use. If refrigerated, the frosting will need to be brought to room temperature before using (after frosting softens up, beat with mixer until smooth).
Recipe Notes: If you prefer a sweeter and/or stiffer frosting, more powdered sugar can be added (up to four cups). But remember, the more sugar you add, the less you’ll be able to taste the tangy cream cheese!
Actually, it’s twitter that brings the world closer together. And it’s because of twitter that I got invited to eat bacon, lettuce and tomato sandwiches with friends from around the world today. Virtually, of course.
It all started with a conversation about bacon between Cheryl in New York and Ellise in Paris. Cheryl had bacon, but no lettuce and tomato. Ellise had lettuce and tomato, but no bacon. They joked about getting together for a BLT lunch. Never one to miss out on a conversation about bacon, I chimed in that I had all the fixings for a BLT and had already planned on making one soon. Next thing I knew, I had been invited to the virtual BLT Lunch on twitter!
Within a matter of minutes, there were others! Karen from Atlanta had some fresh-baked rye bread she thought would be perfect. Kim from South Carolina promised to show up with a Fried Green Tomato BLT. Cathy in California wanted to introduce us to her BLTea featuring her Smoky Tea Tomato Preserves. You see, bacon really does bring people together.
So are you wondering how on earch we could all meet for lunch on twitter? Simple, really. We all made our favorite version of a BLT (bacon, lettuce and tomato sandwich) at some point during the week, and photographed it. Today, everyone is sharing links to photos and blog posts via twitter. We’re using the tag #BLTLunch to make it easy to find each other. It might not be the same thing as getting together in real life, but it’s a whole lot of fun nonetheless!
So it turns out that my contribution to the BLT lunch was actually last night’s dinner. My cousin Corinne, her husband Jason, and best friend Janet are all staying at my house for a few days, so of course they had to be included in the BLT action! They are in town for Comic-Con, so I had to do something special to lure them back to the house to eat sandwiches for dinner. Homemade bread (of course) did the trick!
I wasn’t sure which type of bread I should bake, but I wanted it to be something new and something that I wouldn’t be baking as part of the BBA Challenge. I finally decided on Sheepherder’s Bread, because I have been fascinated by a recipe I had seen in one of my cookbooks recently. It’s just a basic white bread, but it’s a huge loaf that is baked in a big cast iron dutch oven. The part that fascinated me was the instruction to let the bread rise until it actually pushed up the lid of the pot by 1/2 inch. Then, the bread goes into the oven with the heavy lid still on the top, although the lid gets removed partway through baking to allow the top to brown. Interesting.
I accidentally let the bread rise too long, and instead of pushing the lid up half an inch, it kind of spilled out the side a bit. I should have paid more attention to the part in the recipe that told me to watch it closely. But, it still worked! Since it proofed too long, the top wasn’t domed, but it was still a successful loaf.
And did I mention that it was big?
The only real problem I had was trying to figure out how to slice this thing to turn it into sandwich bread!
I guess the homemade bread trick worked since the gang made it back in time for dinner. They even stopped by Whole Foods and picked up some gorgeous tomatoes on the way home!
And now for the sandwiches!
First up is Janet, who made a BLT lettuce wrap since she can’t eat gluten:
You can’t see it, but Janet included avocado in her wrap (I think it’s hiding under the bacon). Looks good, although I’m not sure how I feel about the mustard…
Next up is Corinne’s BLT. She used bread, but much to my dismay opted for a non-toasted version (I always toast the bread!)
Corinne also hid some avocado in there! Now this sandwich is a bit deceiving since it looks like there are only two strips of bacon, but she actually hid an extra layer of bacon on the bottom!
And now for Jason’s sandwich. Again, untoasted bread! And no tomato?? But I have to give him points for using extra bacon.
And here’s mine. I opted for my classic BLT: toasted bread, mayo, bacon, lettuce and tomato.
How to make macarons: a detailed, illustrated step-by-step recipe
Macarons are a French delicacy I am completely crazy about. Since I can’t always be in Paris close to my favorite pastry-chef, Pierre Hermé, I have decided to make my own. It's not an easy task, and it needs a lot of patience. I learned how to make them in Paris, but when I came back I searched around the internet for some recipes providing the perfect ratios. I learned the hard way that macarons are capricious little wonders: add a bit of this or that, and your delicate balance tips over; I’ve seen my share of overbaked, flat, cracked or overinflated numbers coming out of my oven. No recipe is universal, and the most important thing is to go slow. Try cautiously with your own instruments, ingredients and oven. You will have to try more than once before achieving perfection. If they were so easy to do, wouldn’t everyone make them?
When I was looking around for recipes, I found plenty but few had illustrated steps to guide you through what’s OK or not in terms of texture, color and result. Since you can’t always have an experienced teacher showing you the first time, I figured I would allow you to benefit from my apprentissage and help you get to a happy result more quickly.
No single source can be given as a base for my recipe. I have gathered dozens left and right, tested and tasted and ended with my own proportions. Now I (almost) always make them successfully, so this is a good base to start with. I will guide you through the rest.
I have put together a short 5-minute video that shows you the key steps in making French macarons at home. There's nothing like having someone show you the way – at least, that's how I learned. The video, along with this post's detailed instructions and pictures, should allow anyone wanting to make this French delicacy at home succeed.
Macarons: Basic Recipe
These ingredients will make the cookies. This is the base and what’s hardest to master. You should try to successfully bake a couple recipes of basic macarons before trying to mix in other flavors.
3 egg whites (from large eggs), separated at least 24 hours in advance and kept in the refrigerator
210 g powdered sugar
125 g almond meal
30 g regular granulated sugar
What you need – equipment:
It’s best to gather all the equipment you really need before starting. Yes, I did have to buy some of these tools before making my first macarons. The good thing is that none of the following tools are specific to making macarons so your new gadgets will help you make many other great desserts. Please, do take this excuse and go shopping.
Kitchen scale (yes, you do have to measure in grams, it’s more precise)
Food processor (really nice to have but not mandatory)
Hand or stand mixer with whisk accessory (mandatory unless you’re very courageous and/or strong)
Sifter or fine sieve
Big stainless steel bowl (cul-de-poule)
Another big mixing bowl
Spatula
Pastry bag and round tip (1/2 to 3/4 inch opening)
Large baking sheets, preferably 2 to 4 of them
Parchment paper
Various food color (liquid, gel or powder are all good)
A couple of days before you plan to make your macarons: Prepare your eggs. Separate them, putting the whites in a clean airtight container and reserving the yolks for another use. Now, your egg whites must “age”: they need to spend at least 24h (up to 5 days) in the refrigerator before you use them.
The morning of the day you plan to make your macarons: Take your egg whites out of the refrigerator and leave them to temper at room temperature for several hours.
Making the cookies:
Measure the powdered sugar and almond meal and put them in the bowl of your food processor. Finely grind the two together for a minute or two. Stop the processor, scrape the sides and bottom of the bowl, and process again for a minute.
Yes, you need to do this even though both ingredients are already powdered. This step blends the sugar and nuts perfectly together and gets rid of bigger bits that often remain in packaged almond meal. You can grind your own almonds, just make sure they are peeled. And that you very finely grind them (add the powdered sugar to the almonds when they are coarsely ground to make sure you don’t end up with a paste). If you don’t have a food processor, you can still make macarons, but make sure to really thoroughly blend the almonds and sugar together. The consequence is that the texture of your macarons won’t be as soft and smooth.
After processing the powdered sugar and almond meal, you have to sieve the mixture. This is really important (especially if you don’t have a food processor) as it will get rid of the remaining bigger bits and ensure a smooth batter. You will see some of the almond refuses to pass though your sieve (see picture below). Don’t try to force it through; it’s ok to throw it away. The quantity shouldn’t be significant enough to unbalance your recipe.
Here’s what I generally have left after I sieve half of my almonds-sugar mixture:
Set this bowl aside and take your bigger stainless steel bowl out. This kind of bowl is called a cul-de-poule in French and they are so useful in a kitchen that, if you don't have one already, you simply really should invest in a couple of them (different sizes). Stainless steel bowls helps egg whites get fluffy and firm.
Make sure your bowl is cold. Stainless steel usually remains cold by itself, but if it’s not, rinse it under cold water (or stick it in the freezer for a couple of minutes) and dry it before continuing. A cold bowl also makes egg whites happy.
Make sure your granulated sugar is measured and close to your working area. Put your egg whites in the bowl. Start beating them at medium/high speed with your mixer. Once they start to get bubbly and white and you see your whisk is lightly leaving marks, add a tablespoon of the granulated sugar.
Continue beating and add the remaining sugar slowly over the next minute or two. Your eggs will now be white and fluff but not stiff enough. Continue beating at high speed until peaks form and remain up when you take out your whisk (stop your mixer before trying this!). When the egg whites are ready, you’ll notice that they seem dense and creamy and not as bubbly anymore. Here’s what they look like:
Now is the time to put your electric appliances aside. Your egg whites are delicate and you must treat them gently. If you wish to add color, now is the time to do so. I made lemon macarons. I added 15 drops of yellow liquid food coloring and the very finely grated zest of one lemon. Gently fold in the color using a spatula: slide your spatula on the side of the bowl under the egg whites and bring the bottom up to the top. Repeat this until the color is evenly blended. Now is not the time to be in a hurry: DO NOT whisk at any cost as it will deflate youregg whites and your batter will be ruined. At this point, the color of your batter (if you added food coloring) should be at least as intense as you want the final macaron to be. It will intensify and brighten a bit when you add the almonds/sugar mixture.
The batter is now matte, light and fluffy:
Continuing your folding motion, start mixing in your dry ingredients a little at a time(you should add the whole thing in 4 or 5 additions). Carefully blend everything together, always sliding your spatula to the bottom of the bowl and back up to make sure no pockets of dry ingredients remain.
When your batter is evenly blended, it will look shiny and creamy:
Prepare your baking sheets. Double the baking sheets (helps macarons rise and cook more evenly) then cover each with a well-measured sheet of parchment paper. I have tried silicon mats before and I don’t think they work well with macarons. Their rubbery texture seems to cling to the delicate and somewhat sticky cookies so that you more often than not end up with empty shells (the tender insides remaining stuck to the silicon).
Now is the time to fit your pastry bag with its tip. I like to use disposable pastry bags that I wash 3-4 times before getting rid of them. I find that plastic pastry bags are more flexible and easier to work with than textile bags. They are also really easy to clean just by letting hot water run through them and they don’t stain.
To make the transfer from bowl to pastry bag easy, I stand my pastry bag in a measuring cup, folding or twisting the tip to make sure the batter doesn’t come out too quickly. If your pastry bags are long, fold it in half to make sure the batter gets to the bottom of the bag.
Take your bag out of the cup, keeping the tip folded or twisted so that the batter doesn’t come out. Unfold the larger end of the bag and twist it shut close to the batter to push it down. As you lay your macarons on the cooking sheets, you will continue this motion (twisting the larger end of the bag with one hand) to put constant pressure on the batter and ease its way out on the sheets.
Now is the time to work your magic: you have to hold the tip of your bag with one hand to guide it, and hold the larger end with your other hand to push the batter down. Place your tip close to the parchment paper and twist the end of the bag so as to push the batter down and out to form 1 to 1.5” disks. You can set your macarons pretty close together as they won’t expand while cooking. When enough batter is out, stop twisting the end of the bag and swiftly lift your tip up to stop the batter from coming out. This is tricky: you will need practice. Mastering this technique will ensure your macarons are uniform in size and round.
Now, don’t panic. Your macarons have a pointy tip that makes them look like lazy Hershey’s Kisses. Not to worry: as they rest before cooking, they will smooth out. You can help them though: lift your baking sheet up a bit and firmly bang it on the table a couple of times. This will even the caps and take the air bubbles out of them.
If you’re a perfectionist like I am, now is a good time to edit your macarons to make sure they will be perfectly round. I use a small silicon spatula to make oval caps round or smooth down tips that won’t come down. This step is absolutely not mandatory; imperfection can be very charming.
The next step will once again test your patience: you have to let your macarons rest on the baking sheets at room temperature for at least 20 minutes (some say a couple hours is best but I’m not that patient). You just have to. This step will “dry” the caps and help them rise later when they cook.
Halfway through the wait, preheat your oven between 275 and 300°F (135-150°C). Every oven behaves differently. I have a gas oven and 300°F (150°C) is generally good for me. In some ovens, this temperature can be too hot, especially for light-colored macarons (you don't want them to brown). I prefer to play it safe, cook them at a lower temperature and leave them longer in the oven. You will have to test your own oven and stay close to it to watch over your macarons as they cook.
I baked these lemon macarons at 300°F (150°C) for 14 minutes. Your cooking time could be anywhere between 13 and 18 minutes. From 12 minutes on, watch closely, and avoid opening your oven door before that. Your macarons are ready when they look dry and matte and seem firm on their crown when you lightly tap on them. Overcooking the macarons will make them too crunchy and feel like meringue. Undercooking them will make them separate when you try to lift them off the sheets. I know, it’s tricky! After a while, you will know your oven and get better at figuring when your macarons are done. In any case, please play it safe when setting your oven temperature. Excessive heat is the macaron’s worst enemy: they will cook too quickly, cracking like meringue and browning, hiding their beautiful color.
When they are done, take the sheets out of the oven and let them cool on a rack. If you need to reuse your baking sheets for the next batch, let them cool 5-10 minutes in the baking sheet and then lift the parchment paper out of the sheet to set it directly on the cooling rack (this is why it’s good to have more than 2 sheets).
Once cooled to room temperature, your macarons are ready to be assembled.
When they are perfectly cooked, they should lift easily from the parchment paper, have a flat bottom and a beautiful puffy crown. If they stick a bit, help them up with a thin stainless steel spatula so that they don’t separate or break. If they’re a bit overcooked, they will be hollow under the cap. You can still use them, you’ll just have to put more cream to assemble them (yum!).
Match the cap sizes that fit best together. For the filling, the possibilities are as great as your imagination is. For lemon macarons, you can fill them up with lemon curd as I did, or with a lemon-flavored buttercream. If you made pink cookies, fill them up with good-quality raspberry preserves or, if you feel decadent, with a mixture of mascarpone cheese and preserves. The only thing that’s important is to make sure the filling is firm enough to not drip out from the macarons. A great macaron should be able to stand on its side and not lose its filling.
Using an icing spatula (or just a regular butter knife) spread your icing on one cookie. Place the other cookie on the icing and press gently to stick them together.
Once all of your macarons are assembled, in an ideal world, you would put them in an airtight container, in the refrigerator and let them rest for another 24 hours. Yes, you need patience once again. They won’t be bad if you eat them right away. Letting them rest with their icing in really reveals the fine texture of the macaron. The humidity of the icing will get into the crispy caps and that’s what will make them crisp on the outside and so tender on the inside. Try to be patient, trust me, it’s really worth the wait. The good thing is that it’s a great dessert to make in advance and it will for sure impress your guests. They will be at their best if you eat them in the next 4-5 days.
Yes, these French cookies are a really fancy delicacy. No, they’re not easy to make. Yes, they require time, patience and practice to master. But it’s worth it really, and less expensive than a plane ticket to Paris.